The Create Entries Page
Apr. 16th, 2025 09:13 pmI've covered What to post about on Dreamwidth, but now that I think of it, that may have been putting the cart before the horse! That sort of thing is good to know, but harder to do if you don't know how to post on Dreamwidth.
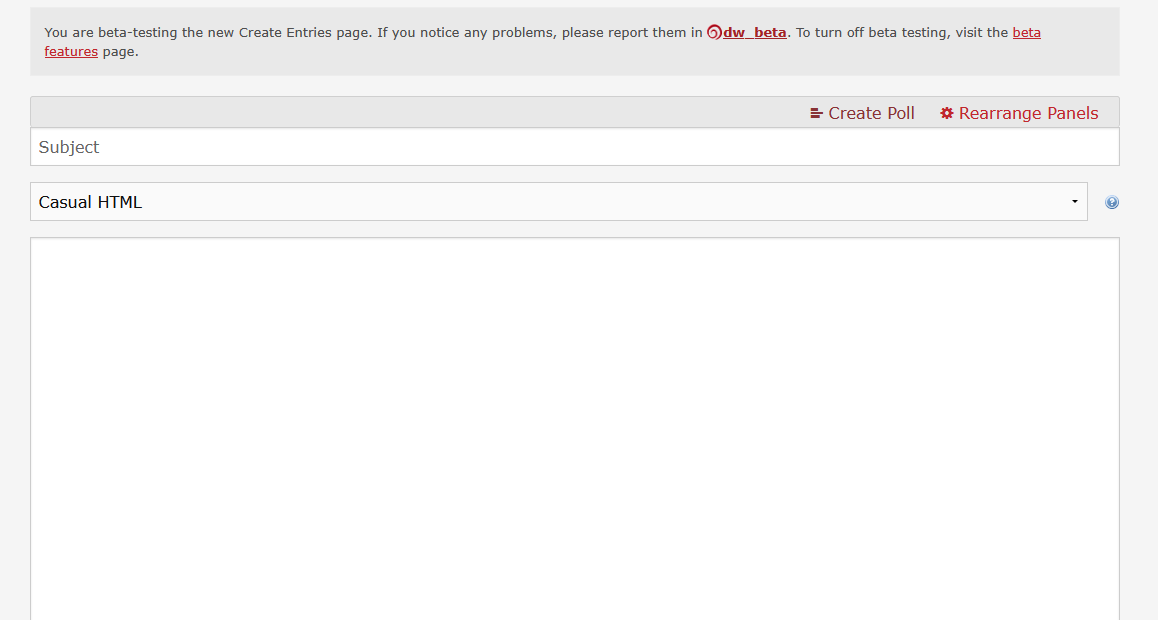
When it comes to actually posting, you'll want to pick a text format to use. I personally use Casual HTML, since it's what I was used to on LiveJournal before Dreamwidth, but I know a lot of Tumblr users are going to be more familiar with Rich Text Entry (RTE); if you want to know more about the RTE options,![[personal profile]](https://www.dreamwidth.org/img/silk/identity/user.png) teres wrote a great breakdown right over here. To find out what HTML you can use on Dreamwidth, check out this FAQ page.
teres wrote a great breakdown right over here. To find out what HTML you can use on Dreamwidth, check out this FAQ page.
Once you have that done, the first thing I'm going to recommend you do is to turn on the Beta "Create Entries" page. Why? Because Dreamwidth is going to make it the default sometime soon, and it'll be better to get used to it sooner rather than later. Also, it's just superior to the original Create Entries page in a lot of ways! I'll go into more detail on that in a moment.
To turn on the Beta "Create Entries" page, first go to the Organize tab. At the bottom of the drop-down menu is the option, "Test Beta Features". On that page, you have the ability to opt in to helping test five different beta features. At the top of that list is the Beta Create Entries page. Click to Opt In on that, and you should be good to go! (I also recommend opting in on the beta Inbox page.)
Now comes some of the fun: If you go visit the Create Entries page now, you'll notice some different features. At the very top, right above the subject line, is the option "Rearrange Panels". Surprise! You can now decide, with some limitations, how you want the Create Entry page to look!
(With thanks toteres for the reminder: There are some animations built into this process; if you want those to go away or to be minimized, that is the final option to click in the Rearrange Panels field.)
The first option is whether you want the text entry field (where you write your posts, title included) to take up the whole area allotted to posting, or if you want to have a column on the right as well. Here's what mine looks like with the right-hand panel and without the right-hand panel. I personally like to have the right-hand panel, because I tend to forget a lot of the stuff that's over there without it, but you may prefer to have the wider text field.
But what is that stuff on the right-hand panel, and do you want any of it? And what's all that other stuff underneath?
At the top is the Icon selection box; my default icon is displayed. If I click on the drop-down menu underneath the icon, I can select any of my other icons by their keywords. Free accounts get up to 15 icons. (I'll go into more depth on those later.) You also have the option to select a random icon, though it's kind of moot if you only have one 😉 (The "Browse" option is exclusive to paid accounts; with a paid account, if you click on that button, a window will pop up and allow you to pick your icon visually. Otherwise, you have to rely on the keywords associated with individual icons.)
The next box below that is for your tags. As I mentioned in a previous post, tags on Dreamwidth are strictly organizational. Whether you want to use them at all is up to you, as is whether you want to enter them when making an entry. After you publish a post, you'll also have the option to add tags after the fact. Browsing tags to select what you want from what you currently have available is available to all accounts. In your own journal, any time you want to enter a tag that does not exist, simply type it in and it will appear in a box with a dotted outline. The tag will become official if you don't remove it before posting. To learn more about how to manage your tags by renaming them or combining two tags into one, click here.
Following that is the Display Date. You can set your account to use the current time whenever you post; if not, it will record your post as having been made at the time you started writing your entry (failing a power outage, page refresh, etc). But! If you don't have "Use the current time" selected, you can pick whatever time you want to input! There are specific limitations on this for posting in Communities, but not, IIRC, for your own personal journal. You can post in the future, or in the past. A lot of people used to post something in the distant future to create a "sticky" post for the top of their journals, but Dreamwidth has an official way to do that, so you don't need to.
Speaking of creating a "sticky" entry, that's another one of your options! There's an area where you can click a ticky-box to indicate that a post should be sticky. An individual account can only have five sticky entries, while a community can only have two.
You can also select the option, "Don't show on Reading pages"; if you select this option, even if you make a public post, it won't show up on the Reading pages of people who have subscribed to your account. This can be useful if you're making a lot of organizational posts at once; for example, yesterday I was copying over a bunch of posts from my Tumblr side account, and didn't want to spam my subscribers' reading pages. I clicked "Don't show on Reading pages", and that should have done the trick!
The "Entry Link" section allows you to create a unique text link for your entry. Usually Dreamwidth will assign a given entry a string of numbers to identify it, but you can change that with the Entry Link. If you're here from Tumblr, you're probably familiar with how Tumblr will include the first few words of a post as part of the entry link; if you want to replicate that, you can do that with Entry Link.
I've talked about the "Currents" section in both Alternatives to Talking in the Tags and A Quick Guide to Mood Themes: The three categories are the Mood you're currently in, the Music you're currently listening to, and the Location you're currently at. You can use any of these, or none of them.
Comment settings are for which people you want to allow to comment on a given post, and who can see them. You have a default for your journal for both of those, which you can learn more about here. You can learn about comment screening over here. You can restrict commenting past your journal default, or make it more or less restricted; ditto with comment screening.
Similarly, you can have a default age restriction for your journal, and change it to be more or less restrictive for a specific journal entry in the Age Restriction section. The options are "No age restriction," "Viewer discretion advised," and "Age 18+". Some people who share adult content, be it visual, written, or other, choose to restrict access to their entire journals to prevent any problems or misunderstandings, but others either go by individual entry, or just avoid posting anything with that sort of content altogether.
The final section is the Crossposting section. Dreamwidth gives you the option to post simultaneously here and to a few select other sites that you may have an account on! These sites include DeadJournal and InsaneJournal. (While LiveJournal is technically listed as an option, I believe LJ's servers stopped talking to Dreamwidth's some years back, so it's not something I would count on being accurate.) Free accounts can cross-post to one other site/account, regular paid accounts to three other sites/accounts, and premium paid accounts to five other sites/accounts. You can set up cross posting by going to Account Settings under the Organize tab; from there, go to the farthest tab on the right—or just click this link: Other Sites. You can learn more about crossposting here.
Now, here's the extra fun part: If you don't want to deal with any one of these fields, you don't have to have them! When you open the Rearrange Panels function, you can select whichever of these you want to keep, and deselect the rest. You can also click and drag the panels to appear in whichever order you like! Don't like the icon picker at the top of the right hand column? Move it under the entry field! Just remember to hit Save in the Rearrange Panels section when you have things set up the way you like them.
On top of that, any of these fields that you do choose to keep, you can minimize! There's a little "minus" at the upper right hand corner of each of the fields; if you click on that, that field will collapse, and most of it will be out of sight. Want it to come back so you can toggle something? That minus sign you clicked before is now a plus sign; click it again, and the field will open back up! This way, you can keep fields that you only sometimes use but don't want to see all of the time without having to Rearrange Panels every time you want to change whether you're using them or not.
One field that won't move is the field where you select whether to post and what privacy level to post at; you can find it right below the text entry field. There you will find one or two drop-down menus. The first menu will allow you to choose the privacy level of the post, be it public (anyone can read it), access-locked (only people you grant access to can read it), access-locked to a specific subset of your access list (a custom access filter), or private (only you can read it).
The second drop-down menu is for whether you're posting to your own journal or to any communities you may be a member of that allow you to post. The default option from both the "Create: Post Entry" drop-down and the "Post" option on the left-hand side of the navigation strip at the top of various Dreamwidth pages is to your own journal, but if you are visiting a community and click the "Post" option on the right-hand side of the navigation strip, it will select that community for you instead. If you post using that method, you will not have a drop-down menu to choose another location from.
And those are the basics of the beta Create Entries page! If I missed anything, or if you have any questions, please feel free to comment and let me know, and I'll do my best to clear things up.
Edit: Shoot, I forgot to talk about cut tags. Next post, maybe?
Edit 2: With thanks toteres for suggestions to make this post better!
When it comes to actually posting, you'll want to pick a text format to use. I personally use Casual HTML, since it's what I was used to on LiveJournal before Dreamwidth, but I know a lot of Tumblr users are going to be more familiar with Rich Text Entry (RTE); if you want to know more about the RTE options,
Once you have that done, the first thing I'm going to recommend you do is to turn on the Beta "Create Entries" page. Why? Because Dreamwidth is going to make it the default sometime soon, and it'll be better to get used to it sooner rather than later. Also, it's just superior to the original Create Entries page in a lot of ways! I'll go into more detail on that in a moment.
To turn on the Beta "Create Entries" page, first go to the Organize tab. At the bottom of the drop-down menu is the option, "Test Beta Features". On that page, you have the ability to opt in to helping test five different beta features. At the top of that list is the Beta Create Entries page. Click to Opt In on that, and you should be good to go! (I also recommend opting in on the beta Inbox page.)
Now comes some of the fun: If you go visit the Create Entries page now, you'll notice some different features. At the very top, right above the subject line, is the option "Rearrange Panels". Surprise! You can now decide, with some limitations, how you want the Create Entry page to look!
(With thanks to
The first option is whether you want the text entry field (where you write your posts, title included) to take up the whole area allotted to posting, or if you want to have a column on the right as well. Here's what mine looks like with the right-hand panel and without the right-hand panel. I personally like to have the right-hand panel, because I tend to forget a lot of the stuff that's over there without it, but you may prefer to have the wider text field.
But what is that stuff on the right-hand panel, and do you want any of it? And what's all that other stuff underneath?
At the top is the Icon selection box; my default icon is displayed. If I click on the drop-down menu underneath the icon, I can select any of my other icons by their keywords. Free accounts get up to 15 icons. (I'll go into more depth on those later.) You also have the option to select a random icon, though it's kind of moot if you only have one 😉 (The "Browse" option is exclusive to paid accounts; with a paid account, if you click on that button, a window will pop up and allow you to pick your icon visually. Otherwise, you have to rely on the keywords associated with individual icons.)
The next box below that is for your tags. As I mentioned in a previous post, tags on Dreamwidth are strictly organizational. Whether you want to use them at all is up to you, as is whether you want to enter them when making an entry. After you publish a post, you'll also have the option to add tags after the fact. Browsing tags to select what you want from what you currently have available is available to all accounts. In your own journal, any time you want to enter a tag that does not exist, simply type it in and it will appear in a box with a dotted outline. The tag will become official if you don't remove it before posting. To learn more about how to manage your tags by renaming them or combining two tags into one, click here.
Following that is the Display Date. You can set your account to use the current time whenever you post; if not, it will record your post as having been made at the time you started writing your entry (failing a power outage, page refresh, etc). But! If you don't have "Use the current time" selected, you can pick whatever time you want to input! There are specific limitations on this for posting in Communities, but not, IIRC, for your own personal journal. You can post in the future, or in the past. A lot of people used to post something in the distant future to create a "sticky" post for the top of their journals, but Dreamwidth has an official way to do that, so you don't need to.
Speaking of creating a "sticky" entry, that's another one of your options! There's an area where you can click a ticky-box to indicate that a post should be sticky. An individual account can only have five sticky entries, while a community can only have two.
You can also select the option, "Don't show on Reading pages"; if you select this option, even if you make a public post, it won't show up on the Reading pages of people who have subscribed to your account. This can be useful if you're making a lot of organizational posts at once; for example, yesterday I was copying over a bunch of posts from my Tumblr side account, and didn't want to spam my subscribers' reading pages. I clicked "Don't show on Reading pages", and that should have done the trick!
The "Entry Link" section allows you to create a unique text link for your entry. Usually Dreamwidth will assign a given entry a string of numbers to identify it, but you can change that with the Entry Link. If you're here from Tumblr, you're probably familiar with how Tumblr will include the first few words of a post as part of the entry link; if you want to replicate that, you can do that with Entry Link.
I've talked about the "Currents" section in both Alternatives to Talking in the Tags and A Quick Guide to Mood Themes: The three categories are the Mood you're currently in, the Music you're currently listening to, and the Location you're currently at. You can use any of these, or none of them.
Comment settings are for which people you want to allow to comment on a given post, and who can see them. You have a default for your journal for both of those, which you can learn more about here. You can learn about comment screening over here. You can restrict commenting past your journal default, or make it more or less restricted; ditto with comment screening.
Similarly, you can have a default age restriction for your journal, and change it to be more or less restrictive for a specific journal entry in the Age Restriction section. The options are "No age restriction," "Viewer discretion advised," and "Age 18+". Some people who share adult content, be it visual, written, or other, choose to restrict access to their entire journals to prevent any problems or misunderstandings, but others either go by individual entry, or just avoid posting anything with that sort of content altogether.
The final section is the Crossposting section. Dreamwidth gives you the option to post simultaneously here and to a few select other sites that you may have an account on! These sites include DeadJournal and InsaneJournal. (While LiveJournal is technically listed as an option, I believe LJ's servers stopped talking to Dreamwidth's some years back, so it's not something I would count on being accurate.) Free accounts can cross-post to one other site/account, regular paid accounts to three other sites/accounts, and premium paid accounts to five other sites/accounts. You can set up cross posting by going to Account Settings under the Organize tab; from there, go to the farthest tab on the right—or just click this link: Other Sites. You can learn more about crossposting here.
Now, here's the extra fun part: If you don't want to deal with any one of these fields, you don't have to have them! When you open the Rearrange Panels function, you can select whichever of these you want to keep, and deselect the rest. You can also click and drag the panels to appear in whichever order you like! Don't like the icon picker at the top of the right hand column? Move it under the entry field! Just remember to hit Save in the Rearrange Panels section when you have things set up the way you like them.
On top of that, any of these fields that you do choose to keep, you can minimize! There's a little "minus" at the upper right hand corner of each of the fields; if you click on that, that field will collapse, and most of it will be out of sight. Want it to come back so you can toggle something? That minus sign you clicked before is now a plus sign; click it again, and the field will open back up! This way, you can keep fields that you only sometimes use but don't want to see all of the time without having to Rearrange Panels every time you want to change whether you're using them or not.
One field that won't move is the field where you select whether to post and what privacy level to post at; you can find it right below the text entry field. There you will find one or two drop-down menus. The first menu will allow you to choose the privacy level of the post, be it public (anyone can read it), access-locked (only people you grant access to can read it), access-locked to a specific subset of your access list (a custom access filter), or private (only you can read it).
The second drop-down menu is for whether you're posting to your own journal or to any communities you may be a member of that allow you to post. The default option from both the "Create: Post Entry" drop-down and the "Post" option on the left-hand side of the navigation strip at the top of various Dreamwidth pages is to your own journal, but if you are visiting a community and click the "Post" option on the right-hand side of the navigation strip, it will select that community for you instead. If you post using that method, you will not have a drop-down menu to choose another location from.
And those are the basics of the beta Create Entries page! If I missed anything, or if you have any questions, please feel free to comment and let me know, and I'll do my best to clear things up.
Edit: Shoot, I forgot to talk about cut tags. Next post, maybe?
Edit 2: With thanks to
Yes ...
Date: Apr. 17th, 2025 05:07 am (UTC)Re: Yes ...
Date: Apr. 17th, 2025 05:18 am (UTC)Anyway, either that next, or maybe a walkthrough for creating an actual Dreamawidth account 😂 Icons are getting pushed back, but with how intensive making this post turned out to be, I'm giving myself some grace!
no subject
Date: Apr. 17th, 2025 05:59 am (UTC)I think you should be referring to the right-hand panel; left-hand panels are still some years in the future.
Also, if you enter a tag that doesn't exist yet in the tag field and post, the tag is created.
Further, I don't think the TOS requires you to mark posts like that? I couldn't find anything on that in "Member Conduct", at least. (I haven't looked carefully, so please take that with a grain of salt.)
One more advanced thing to note: under "Rearrange Panels", you can tick "Use minimal animations" if you want to collapse and unfold the boxes without a sliding animation.
I'm looking forward to the post on cuts!
no subject
Date: Apr. 17th, 2025 06:09 am (UTC)Thank you for the suggested input on the tagging section and "Rearrange Panels"! I'll probably edit those in tomorrow, when I have more brain power. The panel side thing I think I can manage tonight. (Also I just remembered that I meant to include why it's not available on the other side...)
I'm. Reasonably sure I read that somewhere? I think I did, at any rate. I'll dig around a bit more—again, tomorrow; this post already ate two-and-a-half hours of my life, my brain needs a rest 😂
no subject
Date: Apr. 17th, 2025 06:42 am (UTC)Well, glad to have been of help!
Good to hear that you want to edit those in, too! (For why it's not possible... there's some technical issues to solve with that, and it'd be bad accessibility (since you'd be putting the side bars before the main content, I presume).)
For the TOS thing, I found this by Denise (at the end of the comment). It's from 2018, sure, but the TOS hasn't been updated since 2013, so I'm quite sure it still holds.
no subject
Date: Apr. 17th, 2025 06:31 pm (UTC)It might just be for communities? I swear I came across something along those lines while I was setting up
no subject
Date: Apr. 17th, 2025 07:16 pm (UTC)Yeah, I do recall hearing that there's some ways to circumvent the issue, but that it's rather bleeding-edge, and that'll be a way off. Even purely technical,![[staff profile]](https://www.dreamwidth.org/img/silk/identity/user_staff.png) denise mentioned there's more stuff to be solved, which I don't doubt at all; moving panels around on the page seems rather difficult, and IIRC, Dreamwidth's using a plugin for that.
denise mentioned there's more stuff to be solved, which I don't doubt at all; moving panels around on the page seems rather difficult, and IIRC, Dreamwidth's using a plugin for that.
...Just created a community just to test, and I didn't see anything of the sort. Still, I guess a support request would clarify things? This seems like something the team can answer clearly, at least. (And I nearly deleted my journal, too...)
no subject
Date: Apr. 17th, 2025 07:22 pm (UTC)Well, I'm not going to stress about it too much for now; I may look into it later, but in the mean time, I got a request from a Tumblr user asking if Dreamwidth had something they could use for sideblogs, so I think that's going to jump cuts in the queue. I think that a personal community (no one else has posting access, but anyone can subscribe) is probably the best equivalent, though creating a second account is also an option.
Right at this moment, though, I'm going to nap. I'm still kinda worn out, and we're babysitting the niblings again this afternoon 😂
no subject
Date: Apr. 17th, 2025 07:55 pm (UTC)Well, take your time, of course! Those two options also sounds quite good; the closed community is probably the closes thing to it, especially since you can't do much with it outside of showing what you want to show (which, if I'm right, is how sideblogs on Tumblr work?).